[The following is an overview of the Hellgate 100k course. I originally wrote it in 2006, and I’ve amended it several times through the years. I’ve finished the race 11 times, so I don’t have much more to say about it, but I’ve decided to move the overview to this blog for the sake of content consolidation. D’I miss anything, or get it wrong? Feel free to append, extend, expand, propound, or offer your own observations in the comments.]
Hellgate 100k
Alrighty, folks. I was recently looking at a map of the Hellgate course to refresh my memory about how it goes. Then I realized that that was a terrible idea. I mean, after doing this race five times, the one thing you definitely don’t want to do is remember anything about it. But by the time I remembered that, it was too late. Yet the same desire that would make me say, “EWWW, taste this!” after drinking sour milk makes me want to share the memories. So here’s a handy little overview of Hellgate. (I should also note that Keith Knipling put together a far more high-tech overview of the 2007 race. Me, I use a highlighter and a map that I spread on my floor. Keith, he’s got heartrate data, GPS details and elevation profiles. How can I compete with that? I CAN’T, I TELL YOU! *sigh* So I just have to rely on my razor-sharp wit and boyish good looks to keep you interested in what I have to say.)
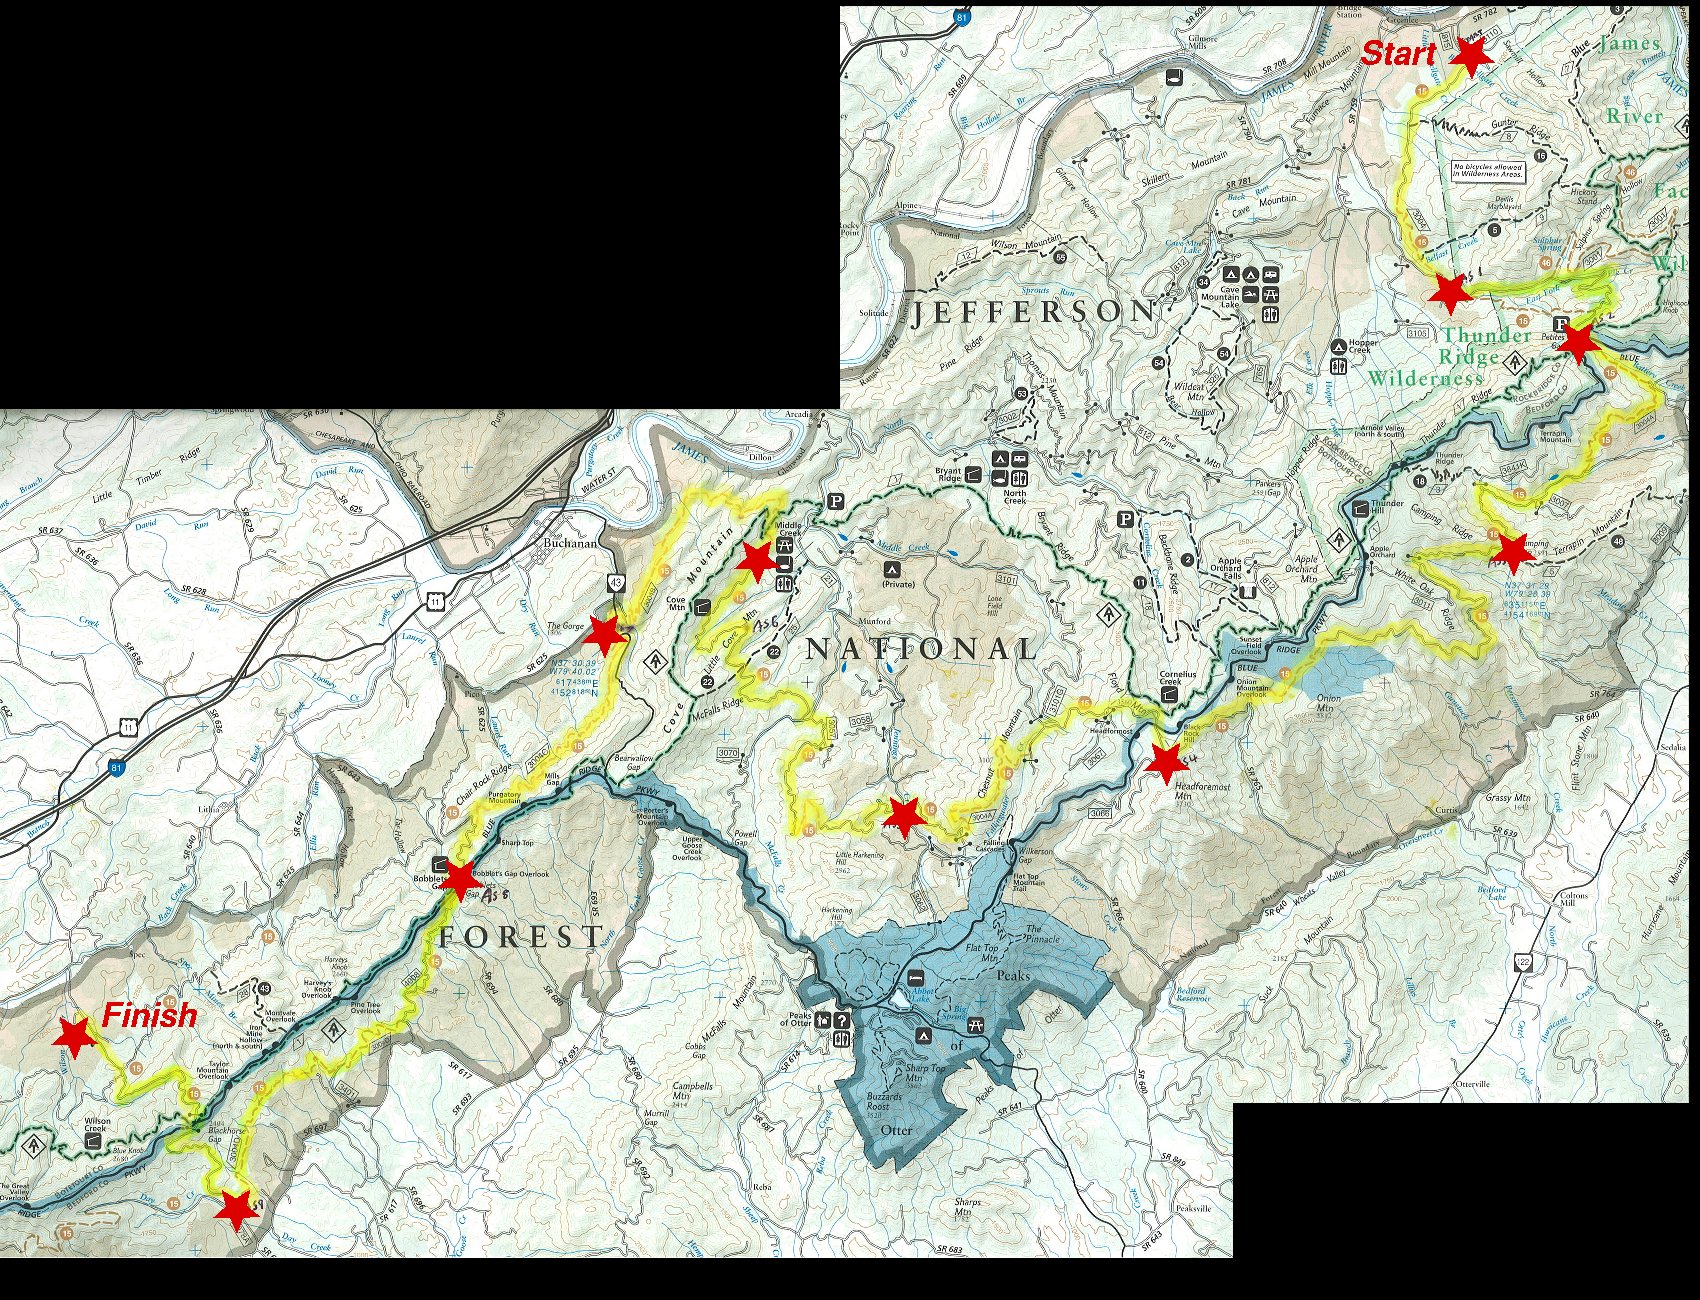
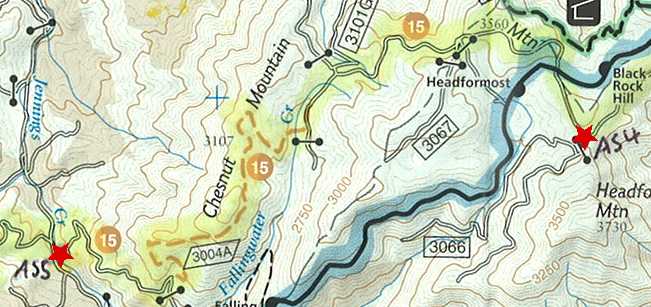
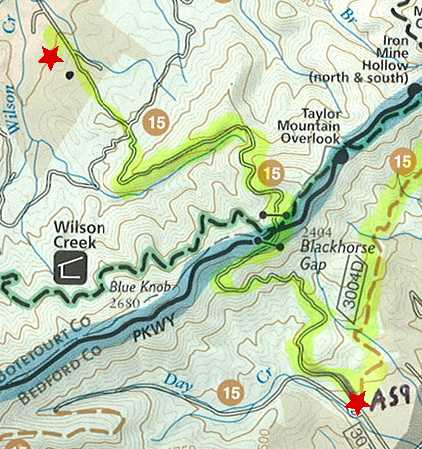
I’ll give you the full map immediately below. After that, I’ve broken it down, aid station to aid station. I’ll give you Horton’s description of each section, followed by the effluvia of my ruminations. In the map below, the race starts in the upper right, and follows the yellow highlighter generally toward the lower left. The start, finish and aid stations are marked with little red stars. The map I used for this little presentation is,
Lexington, Blue Ridge Mts
George Washington and Jefferson National Forests
Virginia, USA
Featuring: Glenwood / Pedlar Ranger District
ISBN: 1-56695-118-6
http://shop.nationalgeographic.com/product/615/803/246.html
I originally put together this overview before the 2006 race. During subsequent years, I realized that there were some sections that I needed to update because I had remembered some details incorrectly. But most of all, I realized that this sort of overview could be only marginally useful. Hellgate, more than any other race I’ve done, has a character that changes drastically from year to year. I’m not just saying that some years it’s chillier than other years. I’m saying that from year to year, this is a completely different race. One year, a certain section of the course might be particularly difficult, and the next year, that same section might be… less notable.
So far, we’ve had,
- 2003 – The first year of the race, no one knew what to expect. The weather was cold, and there was a light fall of snow on the ground. The moon was full, and the sky was clear. With no leave on the trees, no clouds in the sky, and white snow on the ground, the moon lit up the trails like daylight. I turned on my flashlight for the more technical downhills, but I ran most of the way by the light of the moon. And the end of that first year, everyone knew we had been part of something special. And we were all amazed at just how difficult the race was.
- 2004 – The “warm year” was different, in that there was no moon. I was quite comfortable in shorts. When I finished, I wondered how I could have forgotten just how difficult the race was.
- 2005 – The “ice year” was just ridiculous. Several inches of snow fell early in the week. On friday, the temperature rose to the 60s, then fell at night to the 20s. Every road section was covered with glare ice, and every trail section had fluffy snow under a half-inch thick crust of ice. Staying upright was the name of the game. Just walking across the parking lot at Camp Bethel, from your car to race registration, was a harrowing experience. When I finished, I wondered how I could have forgotten just how difficult the race was.
- 2006 – The “cold year” (or “the year of the leaves”) was when we learned that eyeballs can, in fact, freeze. With temperatures around 12°F at Headforemost mountain, and strong head winds, things got ugly. Four people ended up with severely impaired vision when their corneas froze later in the race. (After thawing out, everyone’s vision returned to normal.) Further, due to a lack of recent rain, leaves piled up as high as a foot and a half deep on many parts of the course. With uneven trail and loose rocks underneath, the leaves made footing extremely difficult. When I finished, I wondered how I could have forgotten just how difficult the race was.
- 2007 – The “nice” year was probably as good as it gets. Most years, the 10 or 15 minutes before the race start, as we stand around in our Lycra® and our Polartec®, can be painfully cold. This year was rather nice. I was in shorts, and not particularly uncomfortable (which meant the temperature was in the upper 30s). There had been very little rain leading up to the race, so even the early creek crossing was a non-issue. There was a little bit of ice on some of the roads at higher elevations early in the race, and there were some deep leaves covering trails later in the course, but neither was as bad as previous years. We finally had a year when we could judge whether the race was difficult because of the weather of previous years, or because the course was just that hard. I’ll let you guess what the conclusion was. But I’ll give you a hint: about two seconds after I crossed the finish line, I was flat on the ground. Oh yeah, and when I finished, I wondered how I could have fotgotten just how difficult the race was. (Though I should mention that this year was a very special race for me. The full story is here.)
Are you picking up on the theme here?
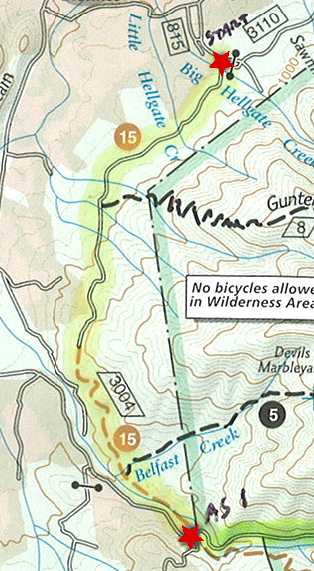
Aid Station 1: Forest Service Road 35
 Horton says: Start to AS 1: 3.5 miles. The first 3 miles are on a relatively flat grassy road with very little elevation change. From 3 to 3.5 miles there are several turns and some single track trails and one stream crossing. You will probably get your feet wet. After crossing the stream you turn left and stay on a single track trail to the AS.
Start at the top of this map, and head down to the bottom.
aaron says: Consider this the prologue. The first section is just a few miles, it’s mostly flat or downhill, with some gentle, short climbs. It’s all very runnable. The only catch is that you will get your feet wet. Just accept it. Even if you can skirt the mud and the creeks, unless you can levitate over the river immediately before AS 1, you will get your feet wet. People come up with all sorts of crazy schemes to avoid it. Really, even in the coldest years, it isn’t so bad. Your feet will have plenty of time to dry. But whatever you do, don’t try to cross the stream on the rocks. In December, they’re usually covered in ice. You’ll just end up falling and getting your whole body wet. And that’s no fun at all.
Aid Station 2: Petites Gap
Horton says: AS 1 to AS 2: 4.0 miles. At AS 1, you turn left on FS 35 and stay on this gravel road to AS 2 (Petites Gap). It is uphill on this gravel road all the way to AS 2. (You gain 1200 feet most of it at the end of the section)
Start in the upper left of this map, cross to the right, then head down.
aaron says: If there’s ice, this part can be tricky. It’s all road, and it’s all uphill. In icy years, it can be tough to find traction. Otherwise, you just need to settle in and climb. This is really an underrated section of the race. It’s early enough that you can still enjoy the run. When I think about this section, I remember climbing the switchbacks of the road, and looking out for miles, toward the next range of mountains to the west. The moon can be so bright, that the earth looks like miles and miles of silver hills. Looking over the edge of the road, I can see 100 little lights, like ants crawling up a hill. Take a moment to enjoy that, and say, “This is why I came!” Because later, you’ll be hating life.
If there’s a full (or even a gibbous) moon out, take a moment during this section to try turning off your flashlight. Give your eyes a few seconds to adjust. The first time you do it, you’ll be amazed at how much you can see once your eyes adapt to the dark. One of the real (few?) pleasures of this race is running by the light of the moon.

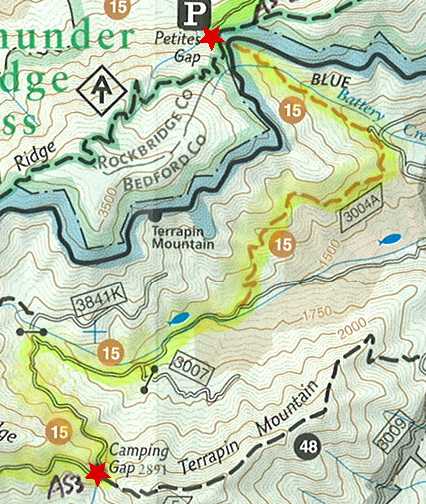
Aid Station 3: Camping Gap
Horton says: AS 2 to AS 3 (Camping Gap): 5.6 miles. You continue for about 100 yds past the AS to the Blue Ridge Parkway (BRPWY), turn right and go about 30 yds and turn left onto a single track trail. Continue on this trail for about ½ mile (pretty rocky). This turns into a grassy road, going downhill for about one mile. Turn right onto a trail for the next couple of miles, hitting a gravel road. Continue on this road for over 2.5 miles (mostly uphill) to Camping Gap.
Start at the top of the map, and zig-zag down to the bottom.
aaron says: You’ve finished the climb to Petites Gap. You cross the Blue Ridge Parkway, and start down single-track. I like downhills, and I love this section. It’s tricky, because in the first half mile, you have a lot of switchbacks, but it’s not super steep. It’s a fun little trail, but be careful because it is fairly technical. Soon, it opens up to a grassy road / double-track trail. You’d like to just open up the throttle, and bolt down the rest of the hill. But be a little bit careful — there are a bunch of holes in the ground, and you can’t necessarily see them. Otherwise, it’s a nice jog
Don’t get carried away, because after a mile, there’s a right turn that is very easy to miss. If you miss it, you’ll keep running for several miles before you realize what you’ve done. But if you keep an eye out to the right, you’ll see glow sticks leading into the woods.
The next part of this section is single track. Lots of ups and downs, and zigs and zags, and slanted trail, and tricky footing. Don’t expect to get into any sort of rhythm. Eventually, you’ll get dumped out on a road. Take a right. One year, I arrived at the road, and found a group of racers not sure what to do. The road was in such bad condition (icy) that the people hanging glow sticks had trouble getting to this section of the course before the lead racers. I had to break the bad news that we had to head uphill. Up, up, up. It’s a looooong climb to Camping Gap.
Aid Station 4: Headforemost Mountain
 Horton says: AS 3 to AS 4 (Headforemost Mountain): 8.8 miles. Continue on the gravel road for 1.5 miles to gate. Go around the gate and continue on the grassy road for about 4.5 miles where it turns into a single track trail leading into a grassy field. Angle left across the field to a road going uphill. Follow the road uphill for about 1/3 of a mile and then turn right on a single track trail going downhill to the road and Overstreet Falls. Turn right and go uphill on the gravel road to the AS at the top of the hill.
*Be prepared for this section!! It is long and tough.
aaron says: Leaving Camping Gap, you have a long section on a gravel road, which turns into a grassy road. It’s slightly downhill, and fairly runnable. Actually, you have a pretty long runnable bit here. Eventually, the road bottoms out, and you start heading up again. After a couple miles of gradual climbing, the grassy road dead-ends, and you take a left onto some single track trail. Stay alert on this bit of single track, because it twists and turn in just such a way that it would be very easy to run off the trail. Somewhere on the single track, you’ll have the distinction of being above all others, as you will go over the highest point on the course. The good news is that, on average, it’s all downhill from there! (In case you really care, you’ll be on a wide, straight, grassy trail that heads uphill a short way. There’s a spot where there will be a ribbon across the trail, and the race course takes a sharp right turn into the woods, and you start to head downhill. It’s the spot where you make that right turn where you’re at the high point.)
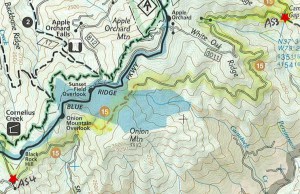
After a few miles, you’ll reach another road section. If you were to take a left on the road, you would go downhill several miles to the start of the Promise Land 50k. (In fact, since the Camping Gap aid station, you’ve been running on the Promise Land course.) If it happens to be a particularly icy year, and the Blue Ridge Parkway is closed across Headforemost Mountain, the aid station will be moved to the point where the trail first dumps you onto the road. Most years, the parkway is open, and the aid station is at the top.On the road, you head uphill for a nice little climb (about 700 vertical feet) to Headformost Mountain aid station. The aid station will be in the parking area where the course crossed the Blue Ridge Parkway.
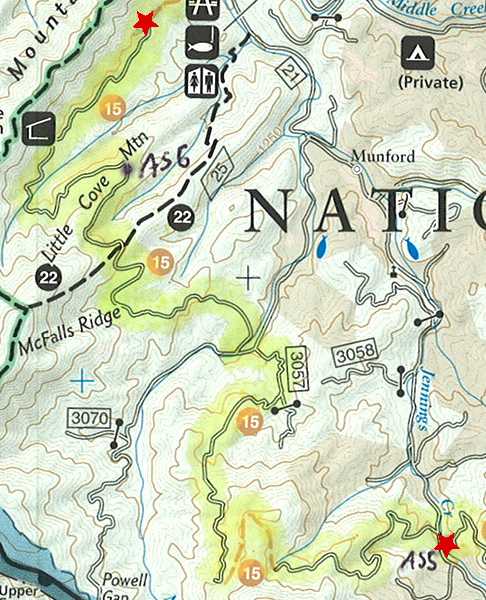
Aid Station 5: Jennings Creek
Horton says: AS 4 to AS 5 (Jennings Creek): Continue on the gravel road crossing the BRPWY in .5 mile. Continue on the grassy road for about 1.5 miles to a bar gate. Go around the gate and straight across a wide area (with roads to the left and right) into the woods on an old road. Go for about 20 yds and turn left on a single track trail. Follow this trail (the trail is marked fairly well with orange diamonds) for about 2 miles to a grassy road. Turn left on this grassy road and do downhill for about 2 miles to the AS.
aaron says: After you leave the aid station, cross the Blue Ridge Parkway. Now you have a nice bit of running. It’s about a mile on a wide, fairly even grassy road, that is ever-so-slightly downhill. From the Blue Ridge Parkway to the next road crossing is rather enjoyable. After that second road, you’re back to single-track. The single-track in this section is slow trail—it’s technical in places, with a few steep ups and downs. Eventually, you’ll reach a grassy double-track trail. The last mile or two of this section is on that grassy road, or double-track trail. That part is downhill, and fairly runnable. However, there will come a point when you can hear the people at the Jennings Creek aid station, and if it’s still dark, you can see their bonfire. You’ll think that you have about a quarter mile left in this section. You’ll be wrong. The trail twists and spirals around the aid station. You’ll run for another half mile, and you’ll realize that you’re farther from the aid station than you were 10 minutes ago. Eventually, you’ll get there. It just won’t be as soon as you think.
Aid Station 6: Little Cove Mountain
Horton says: AS 5 to AS 6 (Little Cove Mountain): 6.9 miles. Turn right at the AS on the paved road. Go for about 200 yds and turn left on a gravel road. Continue on the gravel road until it dead ends at a bar gate. Go around the bar gate and angle to your left into the woods on a recently made road. The road ends and becomes a single track trail. Follow the trail downhill to a gravel road. Turn right on the gravel road and go about one mile, turning into the woods on your right on a single track trail. Follow this trail (downhill) for about one mile coming out onto a grassy road. Take a left on the grassy road and follow it downhill to a gravel road. Turn left o the gravel road and go for about ¼ mile and turn right on Yellowstone Road and follow it for 1.9 miles (uphill) to the AS.
aaron says: During this section, you have a big climb, followed by a big descent, followed by another big climb. When you leave the Jennings Creek aid station, you’ll head north on a paved road for a short distance, then take a left on a packed dirt/gravel road. This road is a lot like the climb to Petites Gap (AS 2), Camping Gap (AS 3) and Headforemost Mountain (AS 4): It’s a seemingly endless climb on a one lane road. You’ll be able to look off to the north (to your right), and you’ll have a mountain rising up from the south side of the road. There are no turns on this road, so you just have to worry about climbing. At the very top, there is a gate, and you’ll enter some single-track. Then you have several miles down the backside of the mountain. You’ll start off on the single-track, then you’ll get dumped onto a gravel road for about a mile, then you’ll take a right turn onto more single- and double-track trails.
At the bottom, you’ll be dumped onto another road. You might actually see some traffic on this road, so be careful. After a quarter mile, you’ll take a right on Yellowstone Road, and climb for another two miles.
(On my little map, I drew a black dot, and marked AS 6 at the wrong place. It’s too low. I think my red star might be too high. I think the aid station is really someplace between my red star and my black dot.)
Aid Station 7: Bearwallow Gap
 Horton says: AS 6 to AS 7 (Bearwallow Gap): 8.0 miles. Follow the grassy road from AS 6 for the next 2 miles when it dead ends. Follow the single track trail straight ahead at the dead end. Follow this trail for the next 1.5 miles and be alert as there are a few turns. After a rocky descent, you come out into a small clearing and a road to your left. Turn left and go downhill on this road reaching a gate after about 1/3 mile. After going around the gate, turn left up an old dirt road. Stay on this road for about ½ mile turning left on a single track trail. The next couple of miles are very rocky. After coming down the hill on switchbacks, cross a stream and turn right on a trail and follow it to a paved road (Highway 43). Go straight across the paved road and follow the trail for about 1/3 of a mile to a big parking area and the AS.
*Be aware: This is the second toughest section of the race.
Start at the star on the right, go up, then to the left, then down to the bottom left.
Note that when you leave Little Cove Mountain, you’ll have completed 35 miles, and you’ll have 31 miles to go. (Forget what Horton says about the milage. I’m telling you: it’s 35 before and 31 after.) I always think of Little Cove Mountain as the half-way point. The second “half” of the race is shorter in distance and (as long as you continue to run somewhat consistently) time. The terrain also changes at this point. Before Little Cove, there is a significant amount of road. In fact, much of that part of the course could be described as “climb up a road, run down a trail, wash, rinse, repeat.” After Little Cove, there’s almost no road. There is also less climbing. However, it becomes a more technical race. Because of all that, about half the racers will tell you that the first half of the race is the hardest part, and half of the racers will tell you that the second half is harder.
aaron says: I remember three things about this section:
- The first mile or so is a nice gentle downhill, and if you have anything left in your legs, you can get into a nice rhythm for a short while.
A lot of this section is on a trail that is slanted steeply to the right, so you’re not running on a trail as much as you’re trying to stay upright while traversing a hill.(Sometime around 2009 or 2010, a long section of this trail was dug out and regraded, so it isn’t quite so slanty anymore.)- One year, I was focusing on not being defeated by the camber of the trail, when I noticed a shadow out of the corner of my eye. I looked up, and saw a person sitting in the middle of the woods. I realized I was hallucinating. Then I realized that I wasn’t hallucinating, and that I was about four feet away from a large man with a large beard and a large gun, looking, no doubt, for something large to kill.
During the 2006 race, I paid special attention to this section, since I couldn’t really remember much about it. I remembered that it started off on a double-track trail that rolled gently for over a mile — very runnable. Then you go around a gate, and start some single-track. The single-track twists and meanders and rolls for miles until it drops down to a creek.
After crossing the creek, you’ll head uphill for a half a mile, mas o menus, on a grassy double-track trail. Keep your eye out to the left for the ribbons that indicate a turn. You’ll take a left turn onto single-track that climb up, up, up, and the trail becomes very rocky. The rest of this section is nasty. To be honest, I have to say it really blows dead goat. It’s that nasty. The trail is narrow and slanted, with jagged, loose rocks under leaves. That continues for far too long. Eventually, the trail turns downward, and the trail switchbacks down the mountain. When you finally cross the road (route 43), you have about a quarter mile of trail left before getting to the Bearwallow Gap aid station.
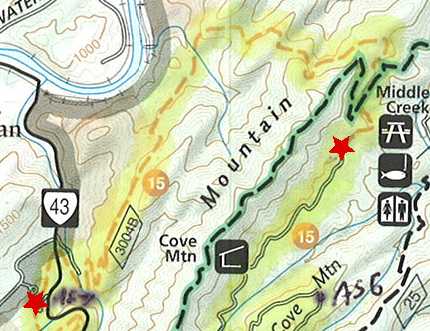
Aid Station 8: Bobblets Gap
Horton says: AS 7 to AS 8 (Bobblets Gap): 7.0 miles. After climbing about one mile on single track trail, the course then contours around the mountain (staying relatively flat, good views) for the next 5 miles. After a sharp switchback to the right, the trail descends steeply for 1/4 mile to a dirt road. You take a sharp left and ascend one mile on this road to Bobblets Gap.
aaron says: Aid station 7, Bearwallow Gap, is the second time cut-off, and the second spot where you can get your drop bag. It’s in a large parking lot, so there might be a lot going on, and it might be tough to leave. Also, since the previous section was so long and difficult, many people — especially folks who feel the cold breath of the time cut-offs breathing down their neck — will arrive at this aid station during a physical and emotional low-point. If there’s any way you can get out of this aid station, DO IT.
When you do leave, you’ll climb a long hill, up, up, up. Then for about the next 300 miles of this section, the trail will follow the ridgeline in the worst way possible. What I mean by that is that although it looks relatively flat on the map, the trail continually swoops into the mountain, then back out again. Each swoop is probably less than a quarter mile. But they get really old. The first few include some steep climbs. But as time goes on, they actually get easier. After the initial climb, and the first few ins-and-outs, the worst is behind you.
Horton will tell you that this is the most beautiful section of the course. You’ll be able to look off the the west (to your right), across the valley. That might be true. All I remember is the dang swooping. In and out, in and out. It gets to be so bad that by the time you get to the end of the trail, and you reach the road, the big climb on the road (once you’re on the road, it’s all uphill to the Bobblet’s Gap) doesn’t seem so bad.
Story time: One year, I was having a particularly rough day. I was struggling to make it to Bobblet’s Gap. Of course, I had been “running” since midnight, and it was now several hours past sunrise. I’m climbing up the road, one foot in front of the other, when a woman drives up next to me, rolls down her window, and asks, “Hey you, how much farther to the top of this hill?”
I looked around, and had to think for a moment. “It’s… Umm… It’s less than a quarter mile, I think.”
“JEEZ!” she exclaimed, “I’ve been driving up this hill forever!” Then she rolled up her window, and drove off.
I was too exhausted even to be amused.
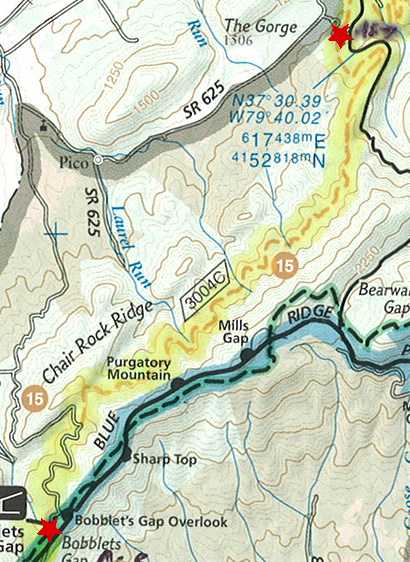
Aid Station 9: Day Creek
Horton says: AS 8 to AS 9 (Day Creek): 6.6 miles. The course follows this rough road for about 2 miles and then about one mile on a good gravel road. At this point you take a right onto a single track trail. From here to the AS the trail is constantly going up and down, and it is very rocky in places.
*** This section will seem like it goes on forever.
aaron says: Alright, I’m just going to throw it out there: this section is long. Like, by miles. There’s a lot of extra trail in this section. 6.6 miles? My sweet patootie, this section is 6.6 miles long. Maybe 8 miles.
Okay, now that we’ve gotten that out of the way, let’s say you get to Bobblet’s Gap with your legs somewhat intact. Now you have a long road downhill that you can hammer. It’s 2.5 miles down the road. It’s the kind of thing where you say, “I really should be running this.” So you run. And it keeps going and going, and you sort of wish it would stop going downhill for so long, because by this point, you really don’t have such a great desire to run for that long.
Anyway, after a couple miles, watch out for a right turn onto a single-track trail. You’ll start up a hill. The hill lasts for so long that by the time you’re half way up it, you start getting nostalgic for that descent on the road after Bobblet’s Gap. For the next few miles, the trail twists and turns and goes up and down. To me, it becomes mentally discouraging because I don’t feel like I’m making any progress in a single direction, and it’s fairly disorienting. Eventually, it straightens out. In fact, the trail straightens out about 6.6 miles after Bobblet’s Gap. So then, you only have a couple more miles to Day Creek!

Finish
 Horton says: AS 9 to the finish: 6.3 miles. You go up for the first 2.8 miles, cross the BRPWY at Blackhorse Gap and then you go down the other side on an old grassy road with the last mile on a gravel road and the last .3 in Camp Bethel, entering the front gate and finishing at the Heritage building. All of this last section is either on gravel road, dirt road, or grassy road.
aaron says: Just as the first section was the prologue to the race, the last section is kind of an epilogue. You’ve run all the crazy miles, now you just have one more climb. It’s about three miles up, then three miles down. The trick is to be ready, mentally, for this last section.
The climb from Day Creek to the Blue Ridge Parkway is on a grassy road / double-track trail. It’s a fairly steady grade, but it twists around the mountain quite a bit. You’ll be climbing, and it will look like you’re almost at the top, then you’ll turn a corner, and realize you had been fooled by a false summit. I’d recommend looking at your watch when you leave Day Creek. It’s going to take most folks between 45 and 60 minutes to get to the top. After 20 minutes, you’re going to start wondering if you’re almost at the top yet. The only way you’re going to know that you’re not even half way there is by looking at the time when you leave Day Creek. When you pass a gate across the trail, make a note of the time — you’re just a little more than a third of the way up. Triple the time it took you to get from the aid station to the gate, then subtract two or three minutes. That will give you the amount of time it will take to reach the top.
At the top, you’ll go around another gate, cross the Blue Ridge parkway, then go around another gate. You have about two miles to go on double-track, then one more mile on paved road. The descent is pretty runnable at the top, but it gets somewhat rocky near the bottom. I seem to remember running over the rocky section near the bottom, not caring how much it hurt my feet. I just wanted to be done. Horton will put up a sign letting you know when you have one mile to go. The end of the run is on a slightly downhill section of road.
The first year of the race, by the time I was finishing, the temperature had warmed up from 0°F at the start to almost 20°F. I was following the yellow streamers to what looked like the finish line, but there was no one around. I worried that I would have to run around, looking for people to let them know I had finished. When I was about 20 feet from the finish line, a group of people came out of the nearest building, and cheered and I finished. Then we all rushed inside. It was WAY too friggin’ cold to be out running that day.
2 Comments
Pingback: Hellgate 2015 Race Report | Lot 23A
Pingback: 2016 Hellgate 100K++ | Random Forest Runner