I recently visited the cabin, and it was cold. Like, excessively cold. Like, 37 degrees, which is perilously close to pipes-freezing cold. The thermostat shouldn’t allow that to happen. I hadn’t been there for more than a month, so I don’t know how long there had been a problem, but clearly, the thermostat or furnace wasn’t working. I went into the crawlspace under the house, pulled some panels off the furnace, and did a bit of troubleshooting on my own. Then I did a bit of troubleshooting with an HVAC guy on the phone. Eventually, we determined that something was, indeed, broken. The HVAC guy came out, replaced the controller board on the furnace, and I had heat again.
At the office, I build and maintain complicated software systems. Any sufficiently complicated system is going to have unpredictable failure modes. I accept that I can’t avoid all possible failure modes, but once I recognize a critical failure class, I build monitors to alert me to any failure in that class. It’s what I do in software, so it makes sense to do it in hardware as well. I don’t know all the failure modes of the heating system in the cabin, but failure of the heating system is certainly a failure class that could have very bad (as in, expensive) consequences.
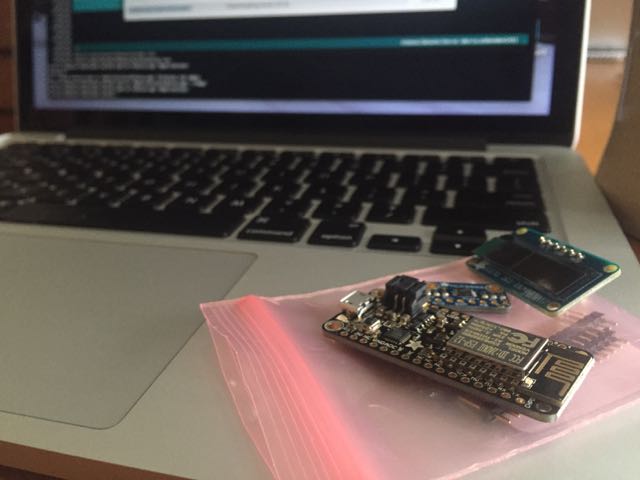
I recently became aware of Adafruit’s new Arduino-compatible line of development boards, Feather. The Feather HUZZAH, is particularly interesting, as it has built-in WiFi (based on the ESP8266 chipset), and costs only $16. With a Feather HUZZAH and a temperature sensor, like the MPC9808 I2C breakout, I could put together an inexpensive monitor. I happened to have a spare, small I2C OLED display that I could add to the mix for a bit of feedback.
The code to initialize and control the temperature sensor and OLED is short and easy. The loop() portion of the sketch reads the temperature, puts it on the display, and if 15 minutes have passed since the last time data was sent to the server, send the temperature to the server and reset timer variable. Finally, shut down the temp sensor and sleep for two seconds. It looks like this:
void loop() {
  float f = tempsensor.readTempF();

  display.clearDisplay();
  display.setCursor(0,0);
  display.print(f, 1);
  display.print('F');
  display.display();

  if (millis() - send_timer >= 1000 * 60 * 15) {
    WiFiClient client;
    if (!client.connect(host, httpPort)) {
      Serial.println("connection failed");
    }
    else {
      client.print(String("GET ") + url +
        "?code=" + mac + "&tval=" + f + " HTTP/1.1\r\n" +
        "Host: " + host + "\r\n" +
        "Connection: close\r\n\r\n");
      send_timer = millis();
    }
  }

  tempsensor.shutdown_wake(1);
  delay(2000);
  tempsensor.shutdown_wake(0);
}
The only problem I had was that when I tried uploading the sketch to the HUZZAH, I got the error,
warning: espcomm_sync failed
error: espcomm_open failed
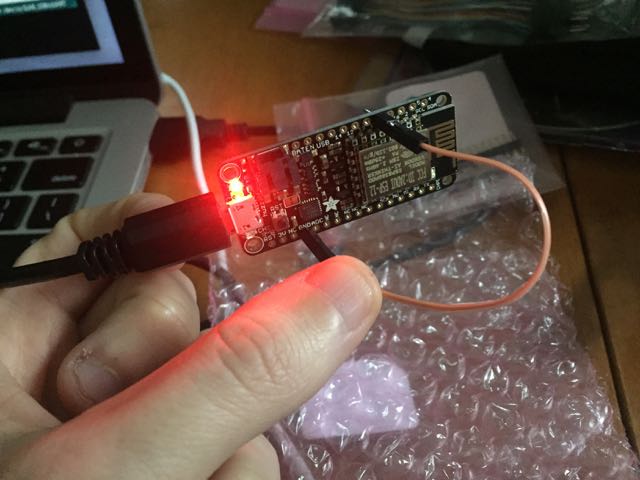
A bit of research indicated that to upload a sketch, I’d need to connect Pin 0 to ground and reset the unit (either by power cycling it, or by hitting the reset button).
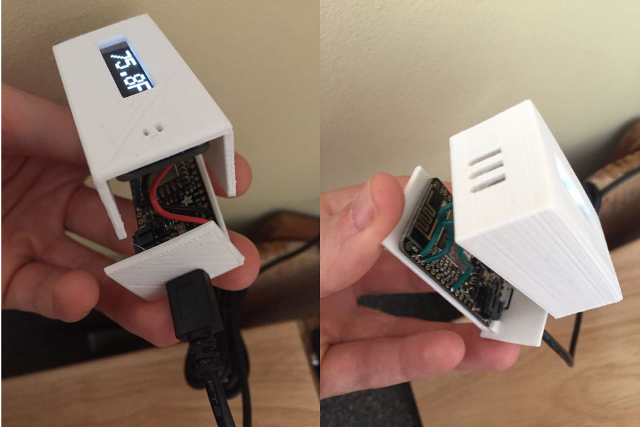
With Pin 0 held to ground, the sketch uploaded. After connecting the temp sensor and OLED, the device seemed to measure the temperature accurately. I took some dimension measurements, and designed an enclosure in TinkerCAD. By the time I had soldered the connections, the two pieces of the enclosure had finished printing.
The last component for this project is a server-side piece that could record the temperature. In the simplest case, I could set up a page that listens for incoming data, and sends me an email or text message when a temperature is posted below some threshold. But I wanted also to be able to see trends over time. So I needed to store readings in a database. Since I might want to have multiple temperature monitors running in several locations, I need to record a source with each temperature reading. To normalize the database, I split the source and measurement into two tables, like this:
mysql> describe sources;
+-------+-------------+------+-----+---------+----------------+
| Field | Type        | Null | Key | Default | Extra          |
+-------+-------------+------+-----+---------+----------------+
| id    | int(11)     | NO   | PRI | NULL    | auto_increment |
| code  | varchar(64) | YES  | MUL | NULL    |                |
| name  | varchar(64) | YES  |     | NULL    |                |
+-------+-------------+------+-----+---------+----------------+
3 rows in set (0.00 sec)
mysql> describe temps;
+-------------+--------------+------+-----+-------------------+-----------------------------+
| Field       | Type         | Null | Key | Default           | Extra                       |
+-------------+--------------+------+-----+-------------------+-----------------------------+
| id          | int(11)      | NO   | PRI | NULL              | auto_increment              |
| source_id   | int(11)      | NO   | MUL | NULL              |                             |
| measured_at | timestamp    | NO   |     | CURRENT_TIMESTAMP | on update CURRENT_TIMESTAMP |
| temperature | decimal(4,1) | NO   |     | NULL              |                             |
+-------------+--------------+------+-----+-------------------+-----------------------------+
4 rows in set (0.00 sec)
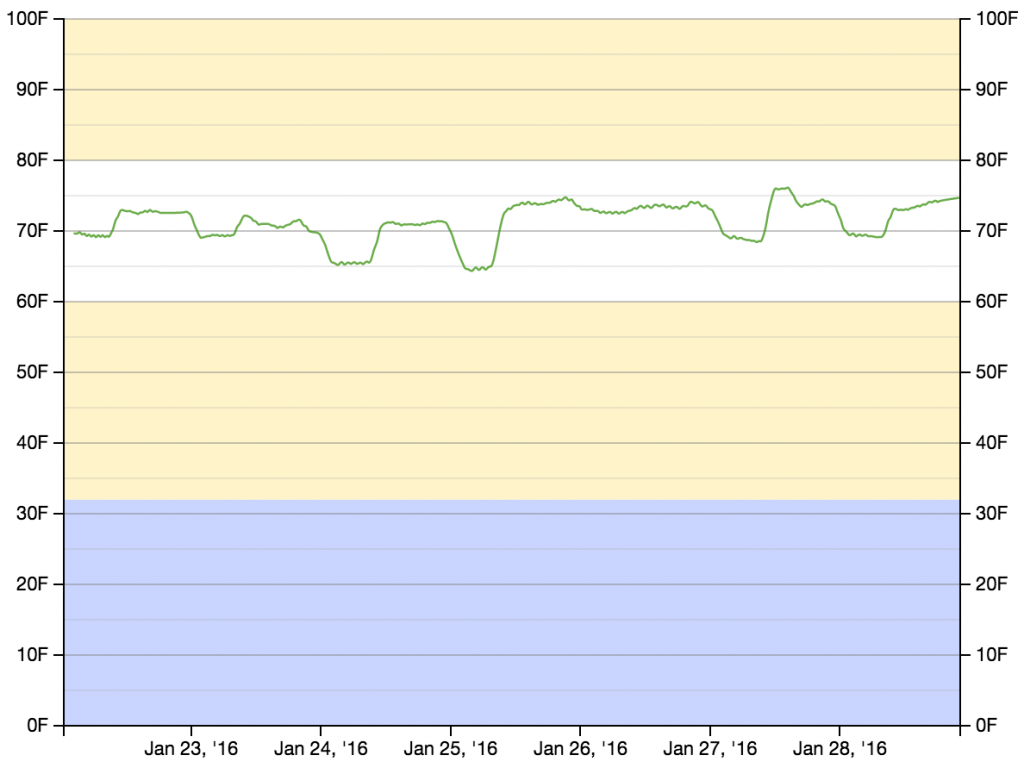
After I had recorded temperature measurements for several days, I had enough data to start putting something on a graph. Rather than building a graphing mechanism from scratch, I repurposed some D3 code that I had written for my UltraSignup Visualizer (which was, at least in part, repurposed from my MMT Graph project). The D3 code pulls data (as JSON) from a PHP script that retrieves temperature measurements and timestamps from some specified source. It then draws the graph, and adds the (slightly smoothed) measurements.
// Smooth temperature readings over avglen measurements
var temperatures = [];
var cur_temp = 0;
var avglen = 8;
var i = 0;
// Seed the running average
while (i < (avglen - 1) && i < results.length) {
  cur_temp += (1.0 * results[i].t);
  i++;
}
// Populate the running average (cur_temp) as a FIFO list of avglen length
while (i < results.length) {
  cur_temp += (1.0 * results[i].t);
  temperatures[temperatures.length] = {x: results[i].d, y: (cur_temp / avglen)};
  i++;
  cur_temp -= (1.0 * results[i - avglen].t);
}

// Create the SVG line function
var line = d3.svg.line()
   .interpolate("basis")
   .x(function(d, i) { return xScale(new Date(d.x)); })
   .y(function(d) { return yScale(d.y); });

// Add the data to the graph using the line function defined above
svg.append("path")
   .attr("d", line(temperatures))
   .attr('class', 'rank_line')
   .style("fill", "transparent")
   .style("stroke", "rgba(71, 153, 31,.8)")
   .style("stroke-width", 1.25);
Now that everything works, I’d like to make a few more of these devices. The main costs are $15.95 for the Feather HUZZAH, $4.95 for the temperature sensor, $17.50 for the OLED display, a few dollars for a micro-USB cable and power supply, and some cents for a few inches of wire and a few grams of PLA (for the 3D printed enclosure). For the cost of the device, the display is disproportionately expensive. Once the device is running, the purpose is to record temperature remotely. If I replace the OLED with a single NeoPixel (which’ll run about $1) that flashes some color code to indicate status, I don’t get the onboard temperature readout, but I DO get the entire device for around $23 (plus the micro-USB cable and power supply). So the next iteration will replace the OLED with a NeoPixel. Stay tuned.

2 Comments
I’m curious, is there a specific but unknown reason your calculating a non-changing value with each iteration of the loop?
Shouldn’t 1000 * 60 * 15 be a defined value for 15 minutes in milli-seconds? Since the value never changes it shouldn’t re-calculated each time…
Interesting story and project.
ran6110, yeah, the reason is maintainability. When I’m scanning through the code and I see 1000 * 60 * 15, I know that that’s 15 minutes, expressed in milliseconds. If I had written 900000, it wouldn’t be as obvious at a glance. It’s a loop that runs once every two seconds, so there’s no need to optimize for speed. If this ran uninterrupted for years, the extra cost of that calculation might add up to some small fraction of a penny. If this were a real-time, time-critical control system, that sort of calculation would be unacceptable. However, in this situation, I’ll take readability over speed every time.
Of course, all of that assumes that the compiler is sort of brain-dead. Just about every modern compiler is smart enough to perform that sort of calculation during compilation, so bytecode doesn’t include the actual calculation — just the result. That way, I have by cake and eat it too.